Let’s face it—whether you are working from home or back in the office, emails just keep on coming. Take charge of your email clutter and never experience having a flooded inbox again. This hack will help you with just that. For this tip, we focus specifically on Gmail, being the world’s most used email provider.
Bursting Your Holiday Bubble
Do you remember the last time you went on leave? Last year, I applied for a two-week-long break for the holidays. It was great! I got to travel to places, spend time with family, and take a breather from work. All in all, it was refreshing to get a little R&R.
But, something dreadful welcomed me the instant I went back to work. You guessed it right—my inbox was flooded with hundreds of emails, waiting to be opened. What a great way to burst the holiday bubble.
“New Normal”
More so now that social distancing is the new norm, people would rather communicate through emails than walk over to someone’s cubicle. To add to that, some companies who have proven that a remote setup works for them still haven’t returned to their offices.
All is well though. Here’s a tip: Gmail has plenty of features that will greatly help in managing your inbox. After going through these 3 steps, you should be able to:
- Quickly filter out all unnecessary emails;
- Properly sort your important emails (More on this later); and
- Efficiently run through your messages.
3 Steps To Make You More Productive on Gmail | Tips and Tricks
Log into your Gmail account and get started managing your inbox. Here are the 3 steps you should try:
Step 1: Filter
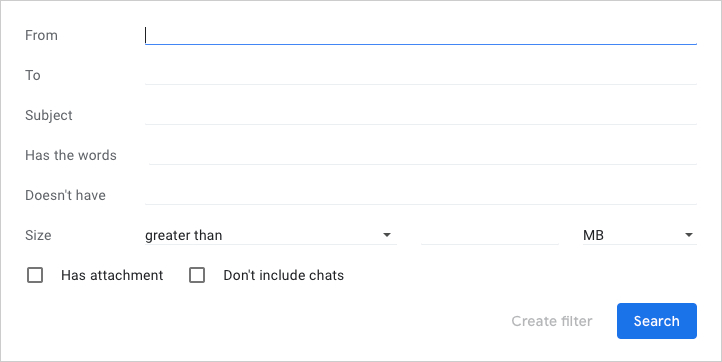
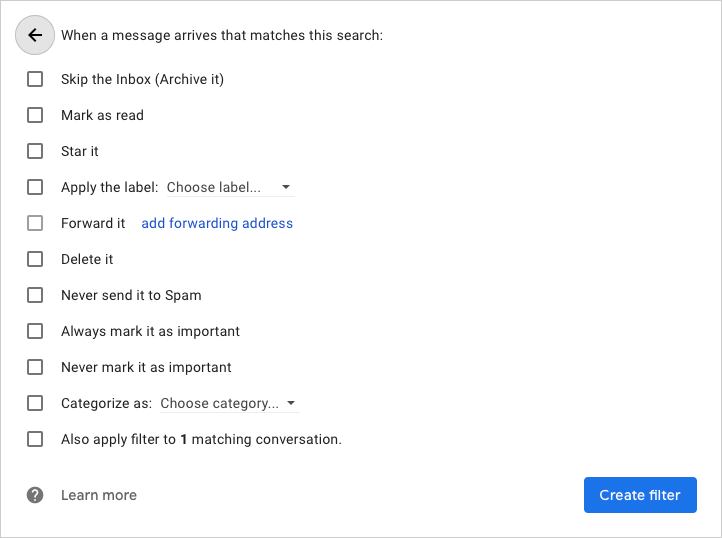
Just like the KonMari method of decluttering, the first step to organizing your emails is removing the unnecessary. Click the gear icon on the upper-right side of your inbox and choose “See All Settings”. Then, select the “Filters and Blocked Addresses” tab. This page allows you to filter through all incoming mail, removing the clutter and leaving you only with important messages.
Gmail allows users to filter emails using the following details:

Then, below are the actions that you can apply to filtered messages:

The question now stands—what emails should you filter? Breeze through your inbox and look for the following:
- Distribution List: This refers to a single email address with multiple recipients. If you are part of a distribution list where some emails are not relevant to you, filter these messages out.
- Subscription: You may be receiving email newsletters from apps or service providers. Revisit if all of these messages are crucial. If not, filter out these emails.
These two instances above are mere examples of emails to filter. In the end, exercise your judgment in figuring out which messages are necessary for you. If you are unsure whether an email is important, you can simply select “Skip the Inbox (Archive it)” rather than “Delete It”. This way, you can still search for these messages when necessary.
Step 2: Sort
Now that you have applied a filter towards incoming messages, the second step to this handy tip is to sort your Gmail inbox. First, go to the right-hand side and scroll down until you see an option to “Create new label”. Labels are a great way to sort your emails in the following categories:
- Action Needed: This classification refers to emails waiting for an action from you. It may be a reply or an attachment. Every email that requires you to do an action should be added here.
- Waiting for Reply: Have you ever forgot an important email simply because the recipient took some time to reply? This second category prevents that from happening. This way, you can easily follow up once you notice that the other party is taking quite some time to respond.
Who knows—maybe they’re swamped with hundreds of emails too. If that’s the case, make sure to send them this article!
Feel free to add other categories that may seem relevant to your emails. If you’re subscribed to business journals or news updates, you may want to add a label called “For Later Reading”.
Next, go back to Settings. On the “Inbox” tab, you’ll see a drop-down menu beside “Inbox Type”. Click it, select “Multiple Inboxes”, and this is what you’ll see. Copy the sections below to create separate inboxes for your newly-made labels.

Click “Save Changes” and enjoy your new and organized inbox!
Step 3: Run Through
The real work with this last step. Run through your mail and categorize each message based on your labels. Feel free to archive those you no longer needed. Don’t worry—you can always revisit these emails with a simple search.
Your goal is to have zero messages on all your inboxes. This may seem difficult at first, but once you get the hang of your new inbox system, you should be going through your mails with ease.
What do you think about this handy Gmail tip? Share your experience on the comments below!
For more email hacks, here’s our latest article on How to Write More Professional Emails.

[…] Push that productivity bug even further! Here’s a 3-step tip to manage your emails better. […]